You can upload Request Letters directly in HealthSource Clarity. A new request will be created for every uploaded PDF file.
This table compares the new Upload Request Letters tool to the manual Add New Request command and the Email option.
Function |
Upload Request Letters |
Add New Request |
|
Number of requests |
Multiple |
Multiple |
One at a time |
File format supported |
PDF only |
||
Data entry fields automatically filled |
No |
Yes |
No |
Automatically attach Request Letter to request |
Yes |
Yes |
No |
Upload Request Letters is available from the Menu for all users.
1. From the Menu, select Upload Request Letters.
2. On the Upload Request Letters screen, choose a Site Location. This field lists all the sites to which you are currently assigned.
3. Add PDF files.
a. Drag and drop file(s) to the Upload box.
b. Click the Upload box to open the Browse window and select the file(s).
4. HealthSource Clarity immediately creates a new request for each uploaded file. The Intake Date for each request matches the date the file was uploaded.
|
There is NO final Submit or Confirm command. If you accidentally upload an incorrect PDF file, you must find, open, and Cancel the request that was created from it. |
|
If your Site uses the Upload Request Letters command, we suggest that you check for failures at least once a day and resolve them yourself whenever possible. |
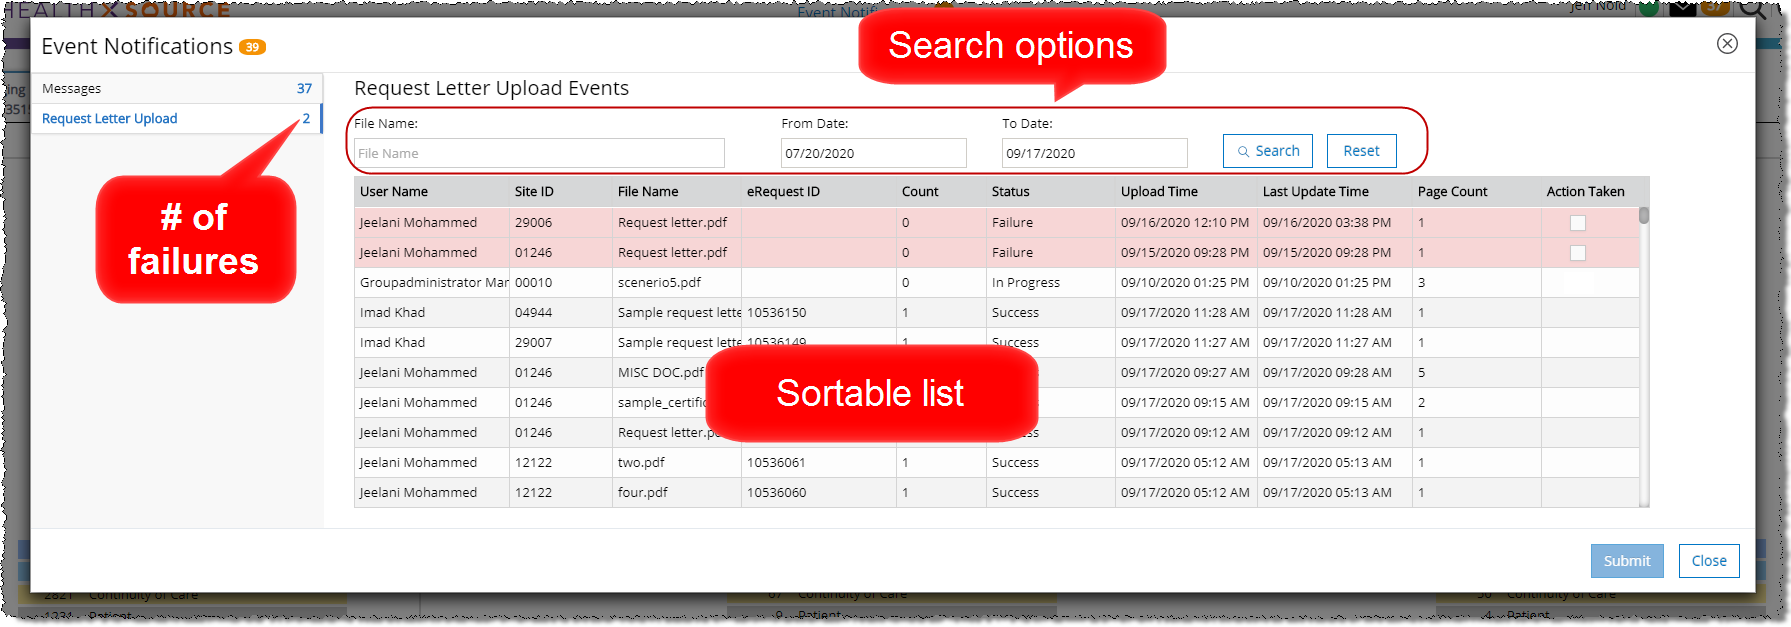
The Event Notifications window lets you see all attempts to create requests through the Upload Request Letter feature.
You can then quickly take action to fix any failures, so that requests aren’t “missing.”
Meaning of “Failure” |
A PDF was successfully uploaded BUT we did not create a request from it. The tracker does not list PDFs that simply failed to upload. You see those immediately on the Upload Request Letters page. |
Time period |
By default, the list shows uploaded PDFs over the last 60 calendar days. You can search for uploads further back than 60 days. |
Users and Sites |
Shows uploads by ANY user at ANY site to which you have access. |
Availability |
Everyone with access to the Upload Request Letters command, which includes almost all users. |
1. Click the Event Notifications link.
a. Even if the Event Count shows 0, like in this example, you can still see information about past uploads.
b. If the Event Notifications link is not visible, there are no tracked events — Messages, Uploaded Request Letters, or Document Transmission issues.
2. Click the Request Letter Upload tab.
a. The number to the right of the tab name shows how many open (un-fixed) failures are currently listed. This number can change if you update the list via searching or if you fix failed uploads.
3. By default, the list includes all uploads over the previous 60 days (success and failures), with any failures shown at the top.
Failed uploads |
Any uploaded PDF files that did NOT result in the creation of a request are highlighted in RED. |
Search for specific uploads |
You can search for specific upload files by file name and / or date range. You can search further back than the default 60 day display period. |
Sort |
Click these column header to sort the list: o Name o Site ID o Status o Upload Time o Last Update Time For example, clicking Upload Time causes the oldest upload to appear at the top of the list, rather than the newest. The other columns are not sortable. |
Column |
Meaning |
Populated for uploads before v2.5? The tracking feature was added in v2.5 |
User Name |
Who uploaded the file. |
Yes |
Site ID |
Site for which the Request Letter was uploaded. |
No |
File Name |
Name of the uploaded PDF file. |
Yes |
eRequest ID |
This column only shows requests created automatically from the uploaded file. It will not show requests created later by: o the Split command. o the Pull List option. |
Yes |
Count |
Number of requests created from the uploaded PDF. |
Yes |
Status |
In order, from the first step to the final possible message: o In Progress o Success o Failure |
No |
Upload Time |
When the file was submitted. |
Yes |
Last Update Time |
When the request reached its current Status. |
Yes |
Page Count |
How many pages the PDF contained. If the PDF contained multiple Request Letters but no Separator Sheets, it will result in a single request that needs to be Split or processed as a Pull List. |
No |
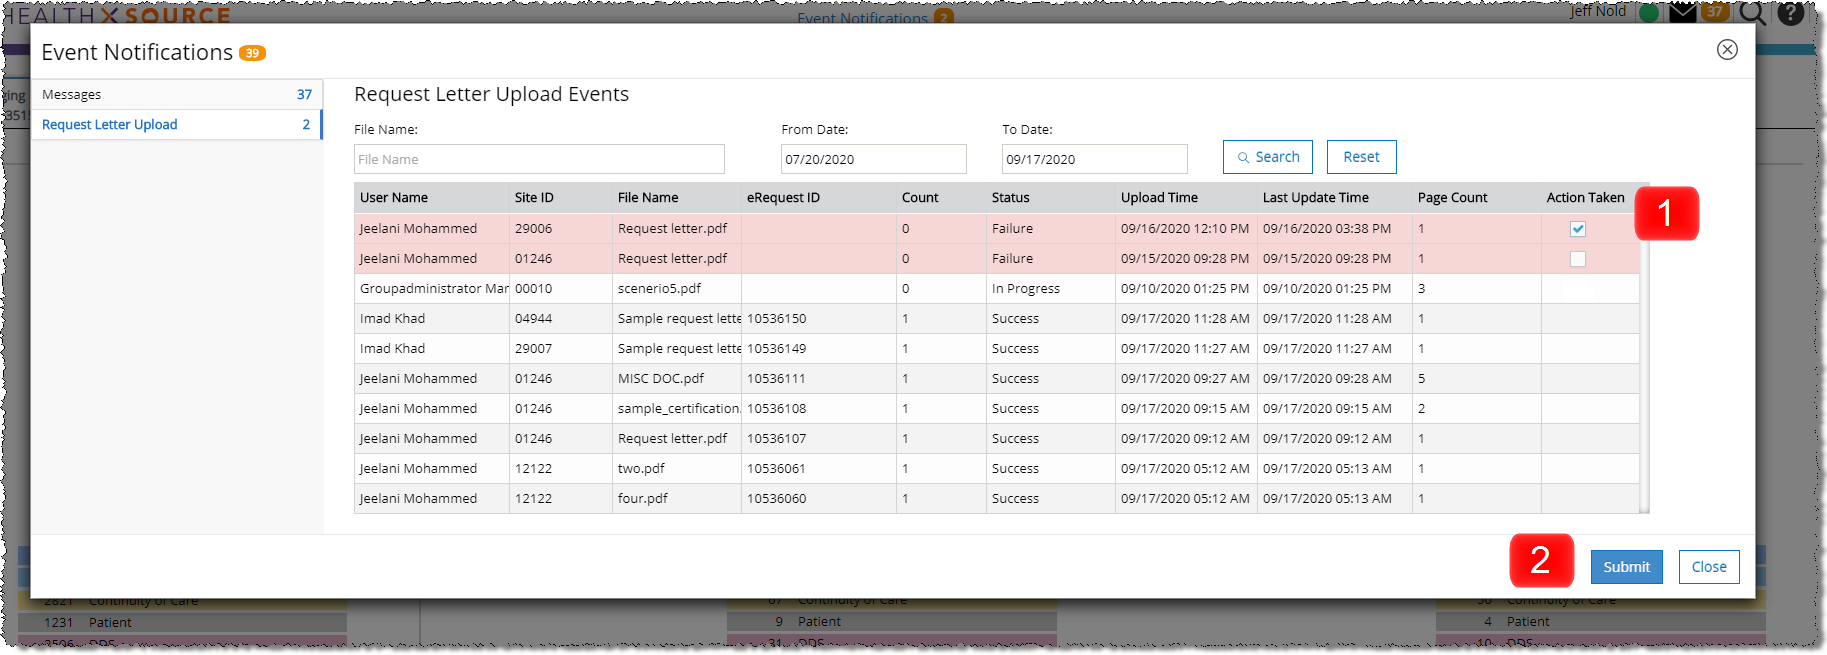
Action Taken |
This column contains a checkbox if the upload Status is: o Failure o In Progress Click here for instructions on using this checkbox to show that you “fixed” a failure or a “stuck” upload. |
N/A |
If the upload Status is Failure or it is stuck In Progress, you can take action to fix it.
For In Progress uploads, you should only take action if you’re sure that the upload is “stuck” and won’t lead to the creation of a request. We suggest waiting at least one full day before marking an In Progress request as Action Taken.
There is no such recommended waiting period for failed uploads. You can mark a Failure as Action Taken as soon as you see it. If you fix a failure but don’t use the Action Taken flag, other people may try to fix it, too, which leads to duplicate requests.
1. On the Request Letter Upload Events tracker, click the Action Taken check box for the failed or stuck upload.
a. You can select multiple requests.
2. Click the Submit button.
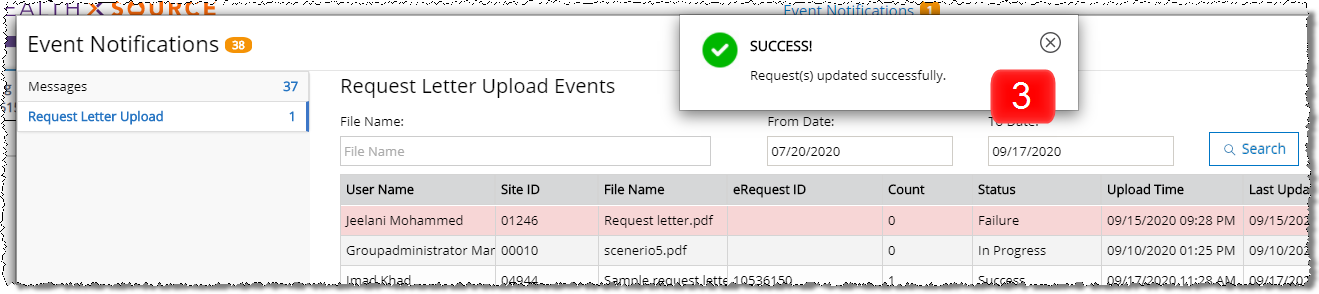
3. You’ll receive a Request(s) Updated Successfully message.
a. This message does NOT mean that we created a request from the PDF. You still need to upload the file again yourself.
4. The Status of the upload will remain Failure or In Progress, but you’ll see a checkmark inside a green circle in the Action Taken column.
a. If someone else fixed the upload, you can see the user name by “hovering” your cursor over this checkmark.
b. “Fixed” failures are shown at the bottom of the list. To move them nearer the top, sort by the Status column. “Open” failures will still be at the top, highlighted in red, but fixed failures will be listed next.
5. Close the Event Notifications window.
6. Upload the "replacement" Request Letter(s) as described above.
7. Check the Request Letter Upload Events tracker. It may take several minutes for the PDF to move from In Progress to Success or Failure.
If the request isn’t a high-priority, you may choose to “ignore” a failure or stuck upload rather than fixing it.
1. At the end of most work days, the Application Support Mangement (ASM) team looks for failed uploads that are NOT marked as Action Taken.
2. The ASM team then tries to reprocess the PDF that was originally submitted.
3. If the reprocessing succeeds:
a. the Status of the upload remains Failure or In Progress.
b. a checkmark appears in the Action Taken column;
c. No user name appears if you hover the cursor over the Action Taken checkmark.
Keep two important facts in mind:
o the Support Team may not be able to reprocess uploads every day. Other critical business tasks may take priority.
o Sometimes, the Support Team can’t fix the problem. The PDF may be corrupt or deleted.
If a requester sends you multiple PDF files as email attachments, consider forwarding that message to the Email Intake process (Intake@cioxhealth.com), rather than using Upload Request Letters.